クラブでモテる!つまみ付きユニコーンポーチ 後編

みなさん、ちょりおつ!ギャル電きょうこです。ギャルによるギャルのためのテクノロジーを提案するユニット、ギャル電で活動しています。今回はクラブ行くときにぎゃんかわに盛れる光るポーチの作り方後編でっす!
Arduino Nano互換機の導入方法
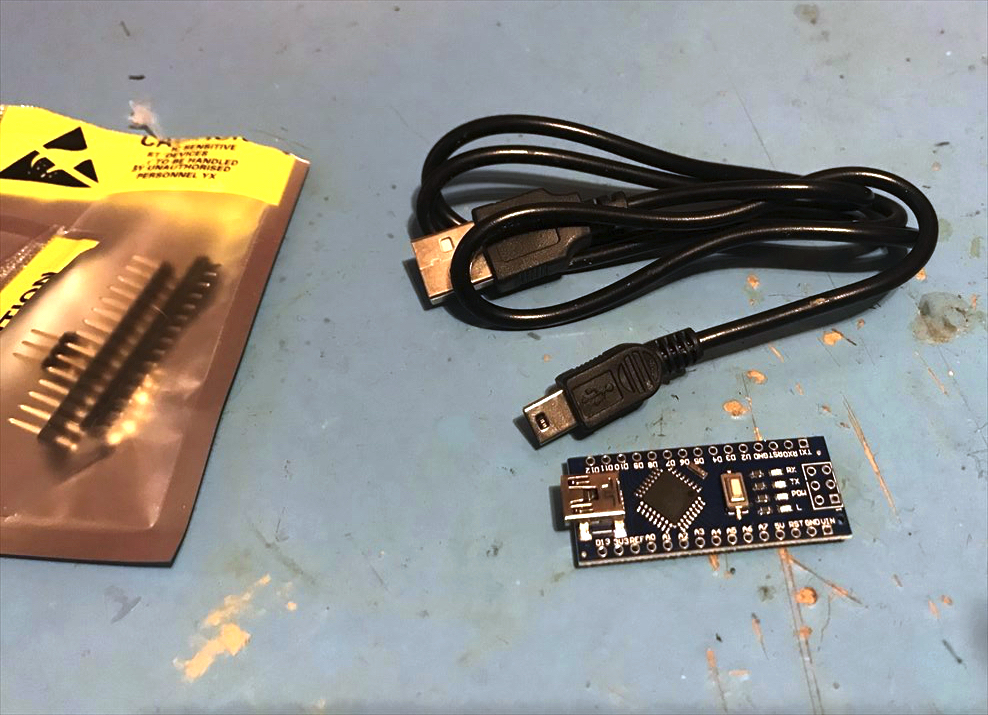
今回使用したボードはArduino Nano互換機。AmazonやAliExpressとかで一枚300円くらいから買える感じの小さいボードっす。いいところは、安くて小さいところ。
導入にクセがあるのと、ケーブルがUSB MiniBタイプなところがちょっとめんどいけど、Digisparkだとちょっと容量足りなくてプログラムが書き込めないときとかにこのボードよく使ってます。
ドライバのインストール
Arduino Nano互換機を使用するためには、ドライバのインストールが必要っす。「Arduino Nano 互換 OSの名前 ドライバ」、または「CH340 ドライバ OSの名前」とかで検索すると親切なインターネット上の先輩方の情報がみつかるとおもいまっす!
Macの新しめの機種使っててうまく認識しない場合には、接続するUSBの口を変えてみるか、USB2.0対応のUSBハブを接続してハブにつなげると認識しやすくなるかも。
あとどうにも認識しないときは、一回忘れて寝る。そんで再トライ。うちらはだいたいコレでいつも乗りきってる。
ボードのセッティング
ドライバのインストールが完了して、デバイスを認識するようになったら、
「Arduino IDE」→「ツール」→「ボード」→「Arduino Nano」
をえらんで書き込み準備オッケー。Aruduino IDEの設定等はインターネットで調べるか、ドキュメントや過去記事等も参考にしてね☆
FASTLEDライブラリの導入方法
今回はいつも超お世話になっているNeoPixcelライブラリではなくて、FastLEDライブラリを使用してLEDを光らせたいと思いまっす。
まずは、ここからライブラリファイル(SourceCode.zip)をダウンロードします。
 https://github.com/FastLED/FastLED/releases
ダウンロードしたファイルを、Arduino IDEを起動して
「スケッチ」→「ライブラリのインクルード」→「.Zip形式のライブラリをインストール」
で指定してインストールします。
プログラム
こちらのページのプログラムを参考にしました。というかLEDの数とLEDのPIN、可変抵抗のPINを書き換えただけでコピペさせていただきました。
「led potentiometer」でググるといい感じの参考作例やプログラムがいっぱいみつかるよ。
//FastLED_AnalogueInput.ino

/*
   Using a potentiometer to control colour, brightness and speed.
 Wire up as per http://arduino.cc/en/Tutorial/AnalogInput
 You can connect the wiper, to any analogue input pin, and
 adjust the settings below.
 You will need three 10k potentiometers.
 */

#include <FastLED.h>

#define LED_PIN 6              // which pin are LEDS connected to?
#define NUM_LEDS 24
#define COLOR_ORDER RGB
#define LED_TYPE WS2811        // i'm using WS2811s, FastLED supports lots of different types.

/*
 set your desired minimum and maxium brigtness settings here.
 Valid values are 0 - 255
 With 0 being fully dim, or not lit, and 255 being fully on.
 Therefore half power, or 50%, would be 128
 */

#define MAX_BRIGHTNESS 164      // Thats full on, watch the power!
#define MIN_BRIGHTNESS 32       // set to a minimum of 25%

const int brightnessInPin = A0;  // The Analog input pin that the brightness control potentiometer is attached to.
const int speedInPin = A1;       // Analog input pin that the speed control potentiometer is attached to.
const int colourInPin = A2;      // The Analog input pin that the colour control potentiometer is attached to.

struct CRGB leds[NUM_LEDS];

void setup() {
  delay(3000); // in case we do something stupid. We dont want to get locked out.

  LEDS.addLeds<LED_TYPE, LED_PIN, COLOR_ORDER>(leds, NUM_LEDS).setCorrection(TypicalLEDStrip);
  FastLED.setBrightness(MAX_BRIGHTNESS);
}

void loop() {
  // read the analog brightness value:
  //int brightValue = analogRead(brightnessInPin);
  // map it to the range of the FastLED brightness:
  int mappedValue = map(analogRead(brightnessInPin), 0, 1023, 0, 255);

  /*
   At this point, brightness could be full off (mappedValue == 0)
   or it could be fully on (mappedValue == 255).
   if you are ruuning from a battery pack, or in a dark room, you
   may not want full brightness.
   Or if you are in daylight, you may not want the pixels to go out.
   the following code, checks if mappedValue is above or below our defined
   brightness settings above.
   It works like this.

   we get mappedValue: if mappedValue is between MIN_BRIGHTNESS and MAX_BRIGHTNESS.
   we get MIN_BRIGHTNESS: if mappedValue is less than our defined MIN_BRIGHTNESS.
   we get MAX_BRIGHTNESS: if mappedValue is greater than our defined MAX_BRIGHTNESS

   so, it limits range of brightness values.

   */

  //int outputValue = constrain(mappedValue, MIN_BRIGHTNESS, MAX_BRIGHTNESS);

  // now we set the brightness of the strip
  FastLED.setBrightness(constrain(mappedValue, MIN_BRIGHTNESS, MAX_BRIGHTNESS));

  // read the analog speed value:
  // map it to a value used in delay();
  int delayValue = map(analogRead(speedInPin), 0, 1023, 0, 50);

  int mappedHue;
  // read the analog brightness value:
  //int hueValue = analogRead(colourInPin);
  // map it to the range of the FastLED brightness:

  // First slide the led in one direction
  for(int i = 0; i < NUM_LEDS; i++) {
    mappedHue = map(analogRead(colourInPin), 0, 1023, 0, 255);
    // Set the i'th led to the chosen colour
    leds[i] = CHSV(mappedHue, 255, 255);
    // Show the leds
    FastLED.show();
    // now that we've shown the leds, reset the i'th led to black
    leds[i] = CRGB::Black;
    // Wait a little bit before we loop around and do it again
    delay(delayValue);
  }

  // Now go in the other direction.
  for(int i = NUM_LEDS-1; i >= 0; i--) {
    mappedHue = map(analogRead(colourInPin), 0, 1023, 0, 255);
    // Set the i'th led to the chosen colour
    leds[i] = CHSV(mappedHue, 255, 255);
    // Show the leds
    FastLED.show();
    // now that we've shown the leds, reset the i'th led to black
    leds[i] = CRGB::Black;
    // Wait a little bit before we loop around and do it again
    delay(delayValue);
  }

}
プログラムを書き込んでテストしてみよう
 プログラムが書き込めたら、ちゃんと可変抵抗器で光り方が変わるかを確認します。
このプログラムでは、
- A0に接続したつまみが、明るさ
- A1に接続したつまみが、点滅速度
- A2に接続したつまみが、色
を調整できるようになっています。
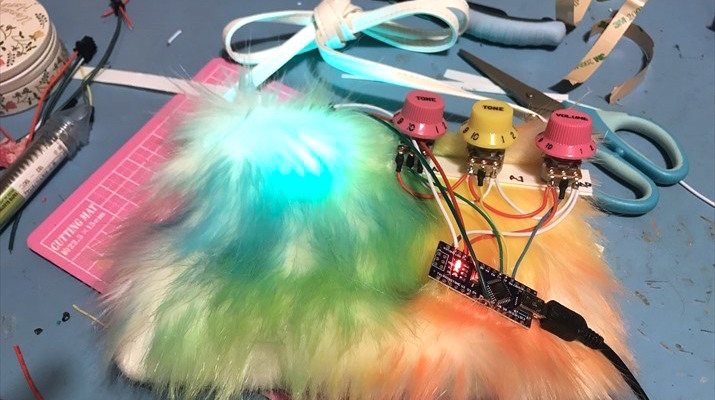
いい感じにポーチと部品を合体しよう
光る部分が完成したので、ユニコーンファーポーチと合体します。
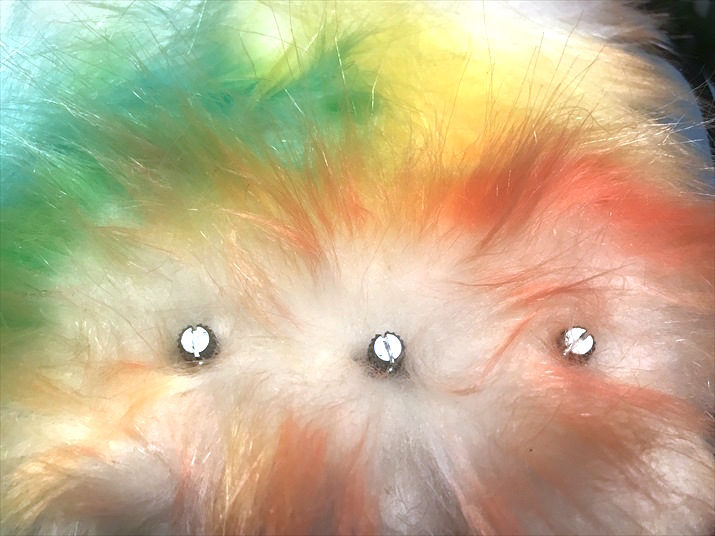
ファーの表面に可変抵抗器用の小さな穴をあけます。可変抵抗器をポーチの表面に出し、キャップをかぶせます。この時、ファーの毛を巻き込んで動きにくい場合は毛を少し刈ります。
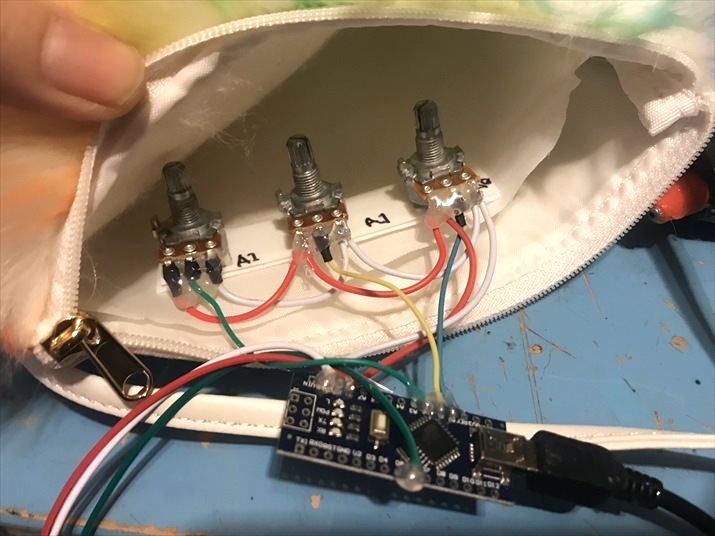 ポーチの裏側にLEDを貼ったプラ板を固定し、配線をいい感じに収納します。今回はポーチに裏布がついていたので、上部を切り開いてポケット状にして超いい感じに格納したっす。
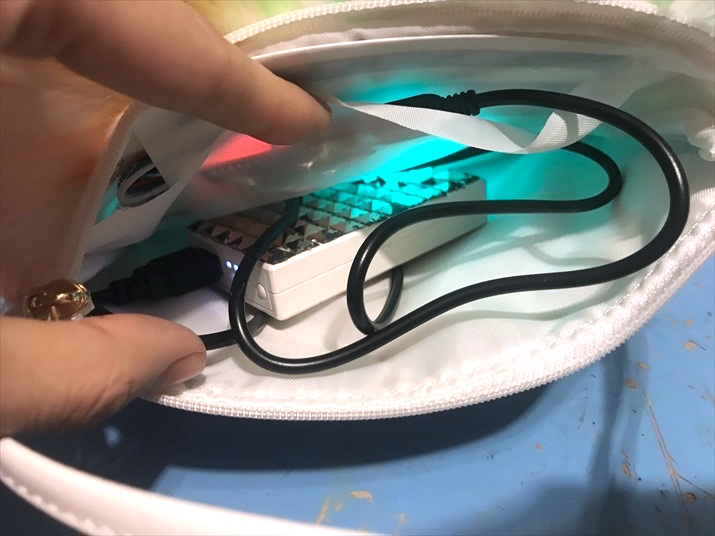 とりあえず、ポーチにLEDとボードとモバイルバッテリーがおさまれば完成でっす!
光らすと超ユニコーン!
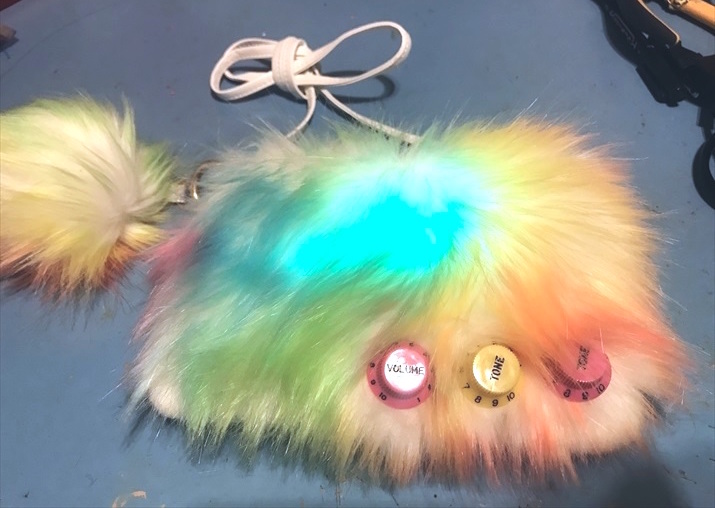 うひょー!超かわいくない?!シーンに合わせてかわいめからハードめまで光りかたが調整できちゃうから、現場(クラブ)でモテる未来しか見えない!!!!
みんなも作ってひからせてみよ!