
How to set up your Nefry for the first time

Hi I’m Wami. I’m a university student who is learning networking in Japan. I’m into electronics since 2014, and I’ve made an IoT device named “Nefry” which is as small as FRISK.
This is a very easy and short tutorial on how to set up the development environment on your Nefry and get started programming immediately. Arduino Software (IDE) needed.
What is Nefry?
Nefry is an IoT Device which allows you to connect internet very easily. You also can attach GROVE sensors to it. Nefry does not need complicated setting thus you can spend more time with making your ideas true.
Nefry also can be connected with useful web services such as milkcocoa (real-time operating system) or IFTTT. Since Nefry works with mobile battery, you can put Nefry anywhere you want.
Let’s get started
You can make a program for Nefry on Arduino Software (IDE). Arduino is an open-source electronics platform which provides “Arduino language” to develop hardwares easier.
Arduino Software (IDE) is a software for writing Arduino language.
Downloading Arduino Software (IDE)

You can get the latest version of Arduino Software (IDE) from the download page.
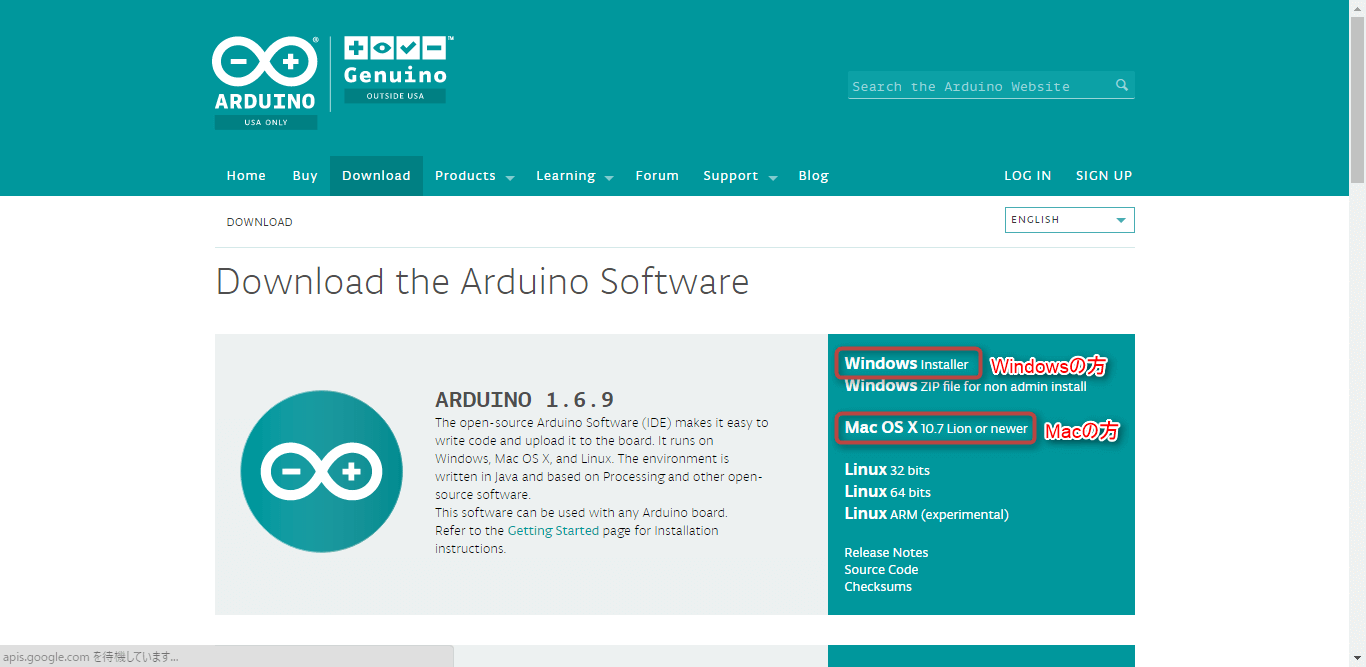
If you are using Windows, choose “Windows Installer”. If you are using Mac, click “Mac OS X” to install.
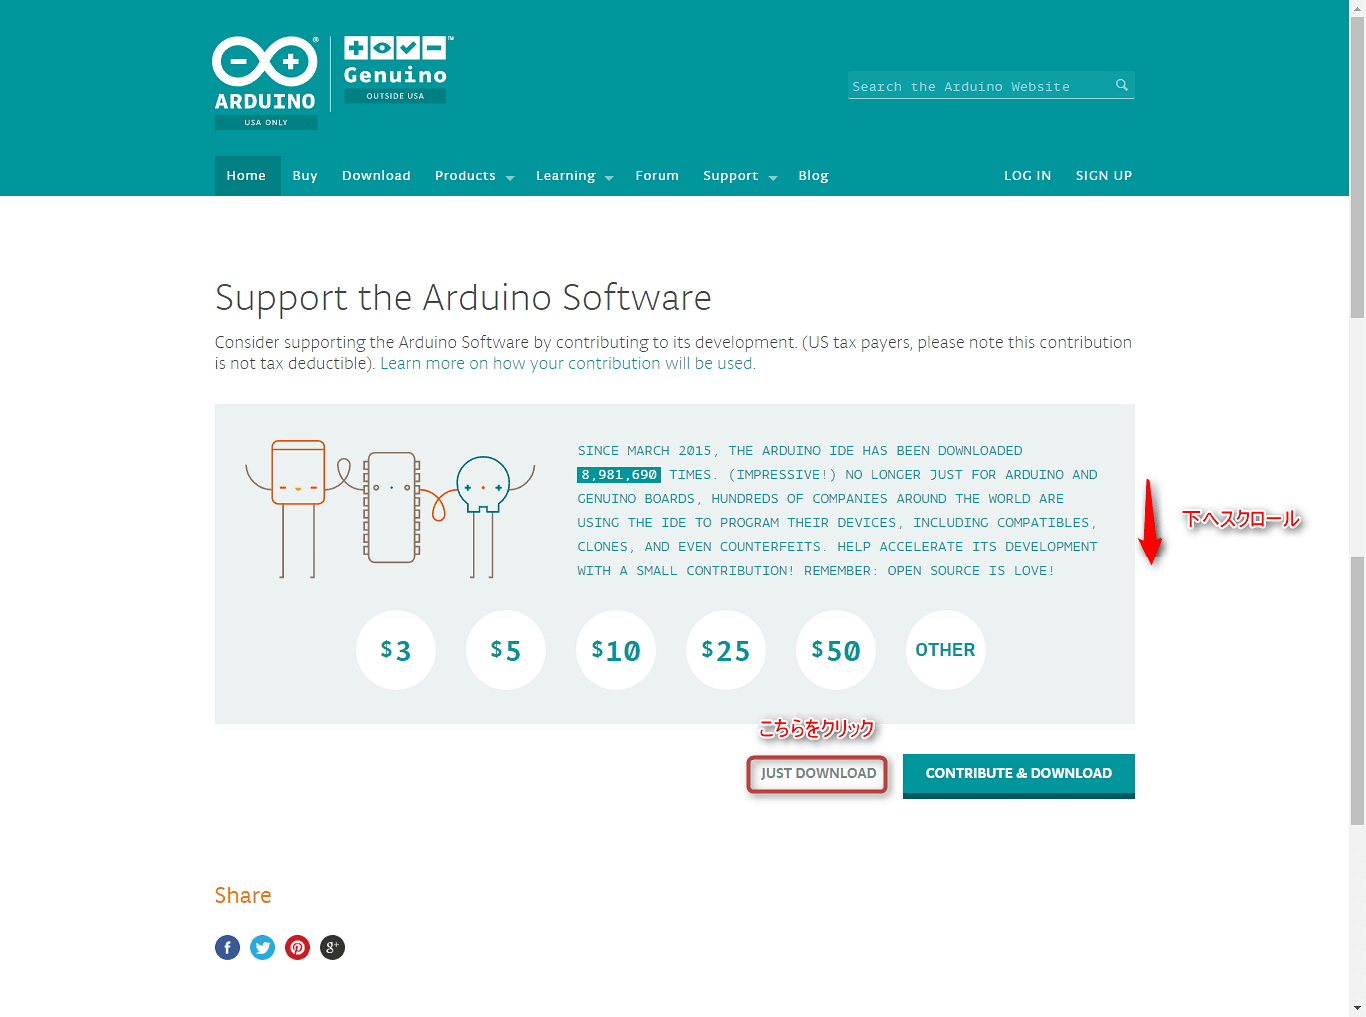
After choosing the software, the page above will come up. If you want to donate and donate, choose “CONTRIBUTE & DOWNLOAD”. Otherwise click “JUST DOWNLOAD” to start downloading.
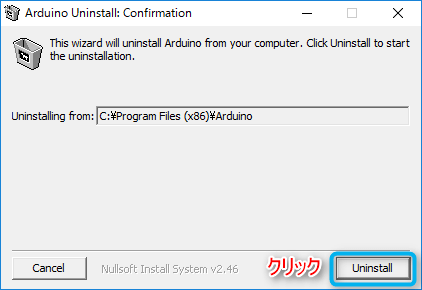
When a popup like this comes up (Needed uninstalling)
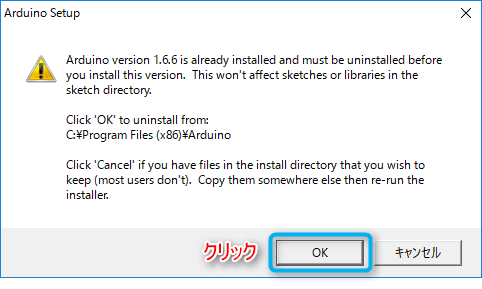
If a popup like this comes up, that means you have already installed old version of Arduino Software (IDE). Click “OK” to uninstall the old one.
If not, please skip until next headline.
Installing Arduino Software (IDE)
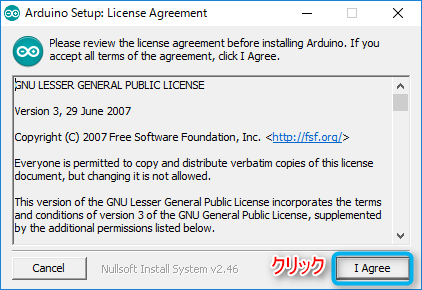
If you do not have any problems with Licence Agreement, click on the “I Agree” button to the next step.
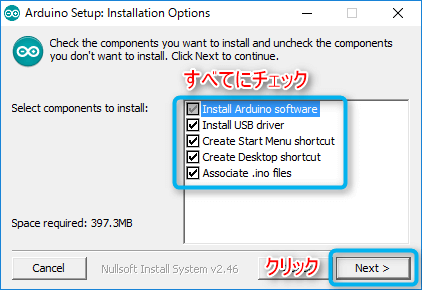
You can select options (There is no problem with all checked though). Click “Next” to following step.
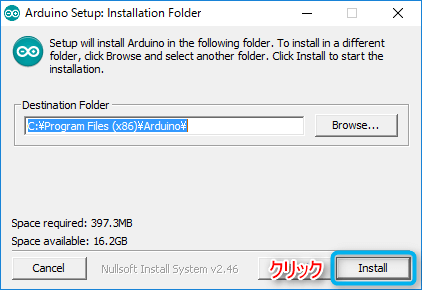
You can browse the installation location.
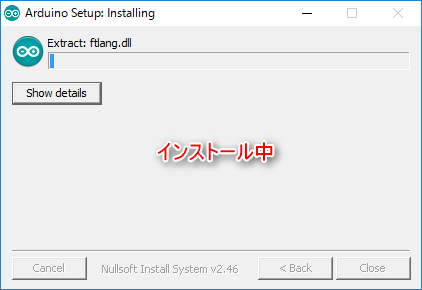
Please wait for a while until install finishes.
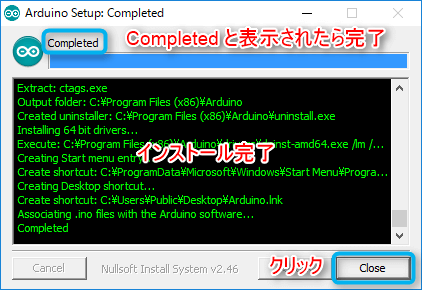
After the installation finishes, you will see COMPLETED on the desplay.
Activating Arduino Software (IDE)

After you have installed the Arduino Software (IDE), there will be an icon like this on you desktop. Double click to run Arduino Software (IDE).

Arduino Software (IDE) will automatically start-up.

You can now start programming. Well done!
Installing the Nefry board
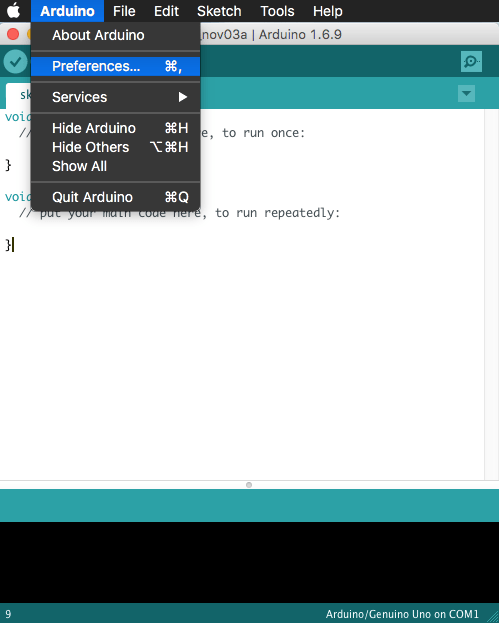
Arduino Software (IDE) does not support Nefry. To activate Nefry, you need to install the “board”. Open “Preferences”, and type the URL below to the new Additional Boards Manager URLs option.
http://wamisnet.github.io/package_nefry_index.json
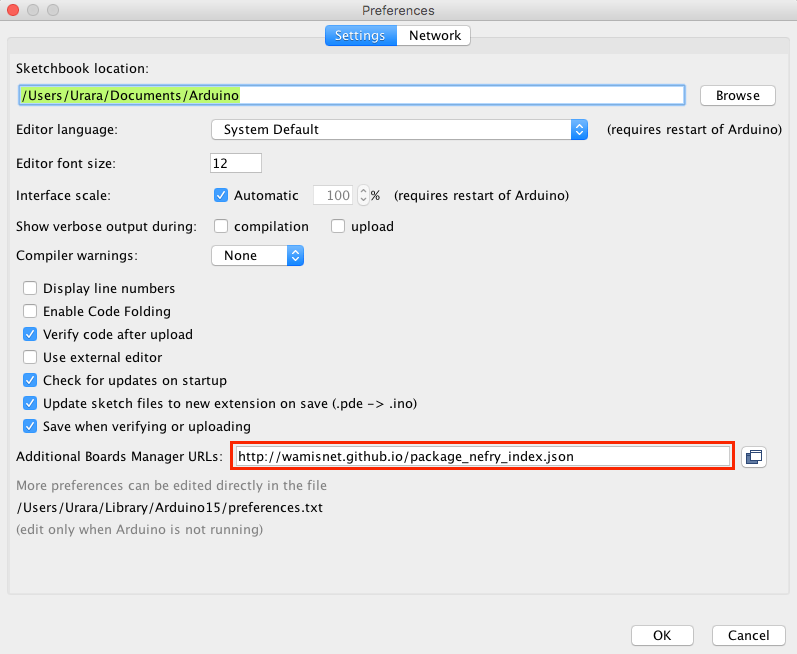
Click “OK” to save the new preference settings.
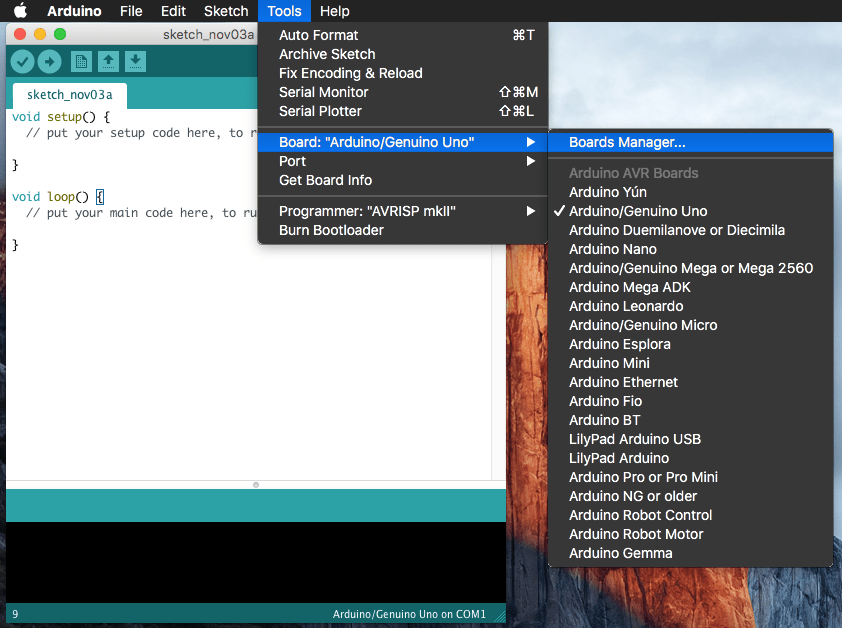
Open the Boards Manager by navigating to the Tools > Board menu.
You will then be able to select Nefry and install the board. If you can’t find Nefry, please reconfirm you have typed the correct URL at Additional Boards Manager URLs option.
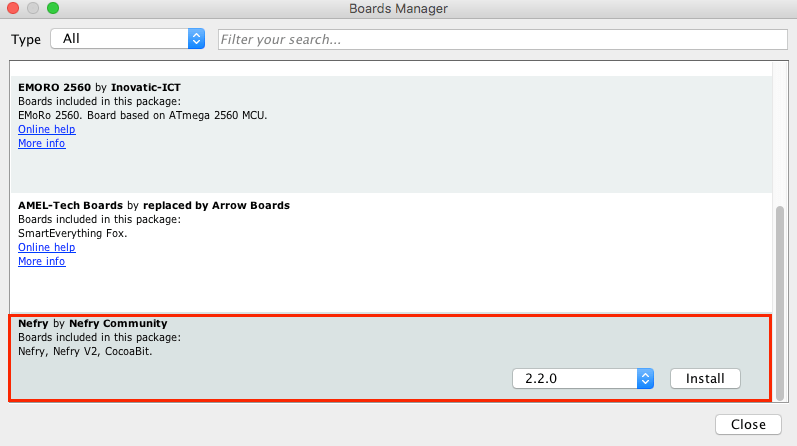
Making install clean
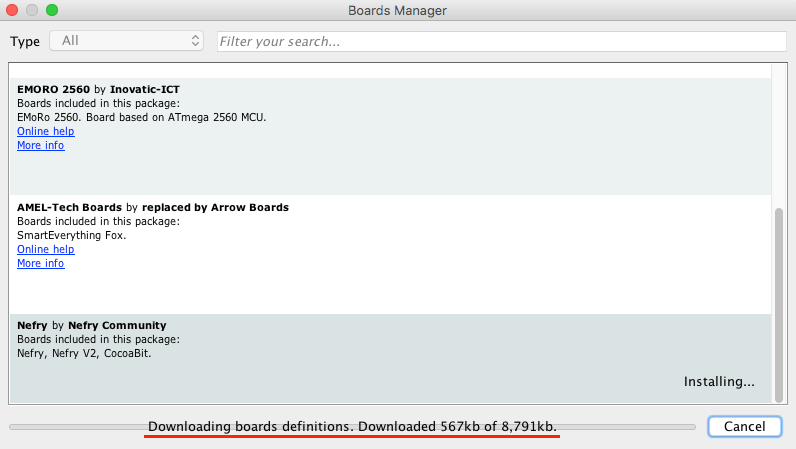
Click on “Install” button to install the latest version (v1.6.12 2016/11/01). Download will begin in a moment.
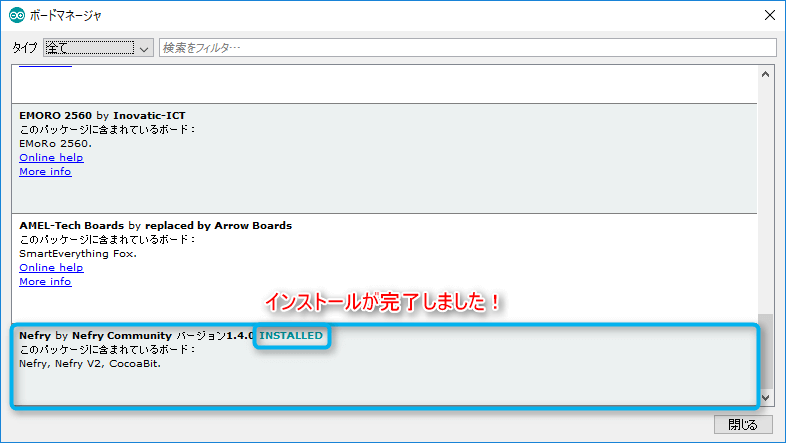
“INSTALLED” comes up when the installation is completed.
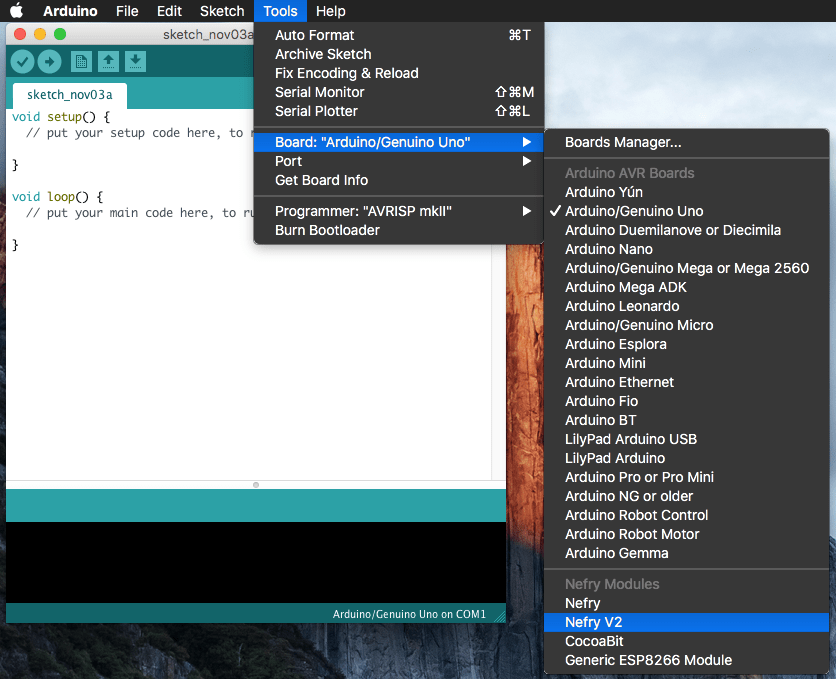
You can now choose Nefry V2 on the category drop down menu (Tools > Board “Nefry” > Nefry V2). These settings are needed at the first time.
Once you have done the primary settings, you can start from writing codes.
Update to the latest version
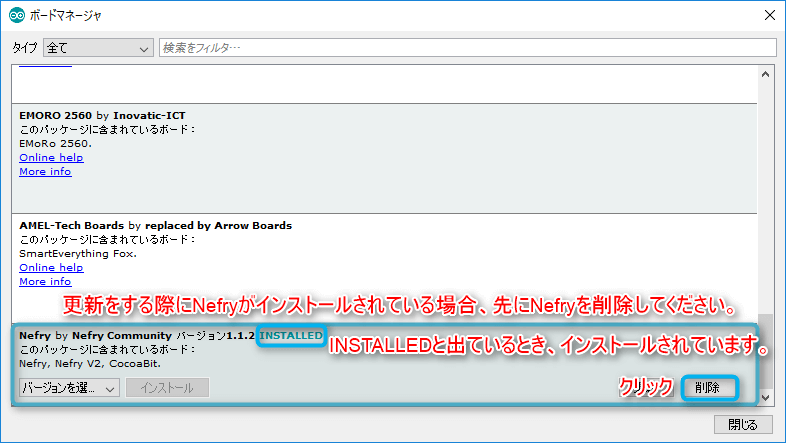
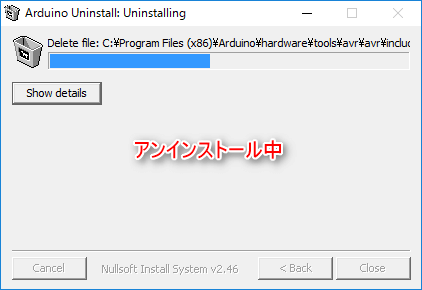
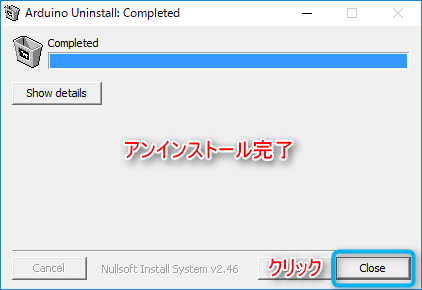
Some troubles may cause if the old version of the board remains in your computer. You need to uninstall it by “Delete” button. Please wait for a while until uninstall is completed.
After uninstalling, you can now install the newest version of Arduino Software (IDE). Please refer the headline “Making install clean” above.
Writing the code
So now let’s write the program for Nefry. Nefry runs with the same codes with Arduino. When you run Arduino Software (IDE), following program should be written from the beginning.
void setup(){

}

void loop(){

}
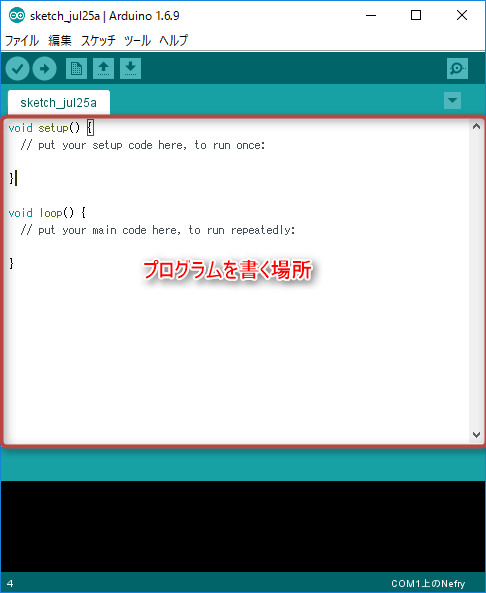
Let me briefly explain about these codes.
void setup()
In this part, you write processes to be carried out only once at start-up. For example, settings for input and output pin, or initial setting for sensors.
void loop()
In this part, you write processes to be repeatedly carried out during the boot. For example, LED blinking or sensor data acquisition.
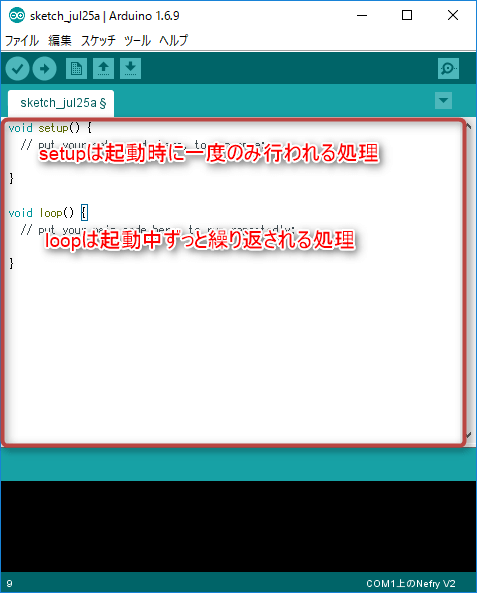
To wrap up, it is like this.
Using LED
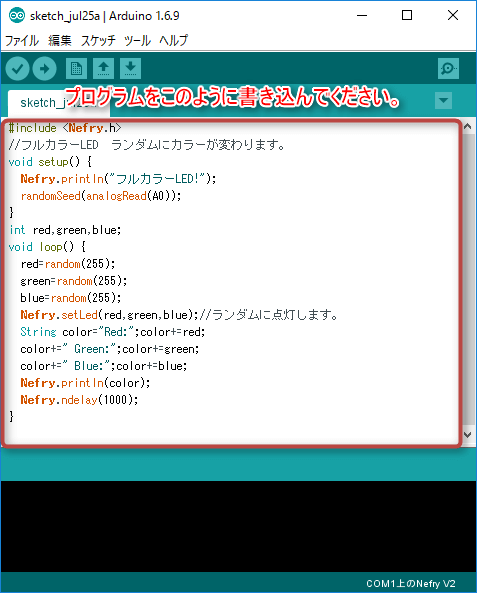
This time, we will blink full-color LED randomly. Please delete all statements written on Arduino Software (IDE), and paste the program below.
#include <Nefry.h>
//full-color LED, the color changes randomly
void setup() {
  Nefry.println("fullColorLED!");
  randomSeed(analogRead(A0));
}
int red,green,blue;
void loop() {
  red=random(255);//random function reply numbers from 0 to 255 randomly
  green=random(255);
  blue=random(255);
  Nefry.setLed(red,green,blue);//LED blinks randomly
  String color="Red:";color+=red;
  color+=" Green:";color+=green;
  color+=" Blue:";color+=blue;
  Nefry.println(color);//Nefry console shows the color
  Nefry.ndelay(1000);//wait a second
}
Nefry functions are used in some places. I summarized these on Qiita. Please have a look if you are interested.
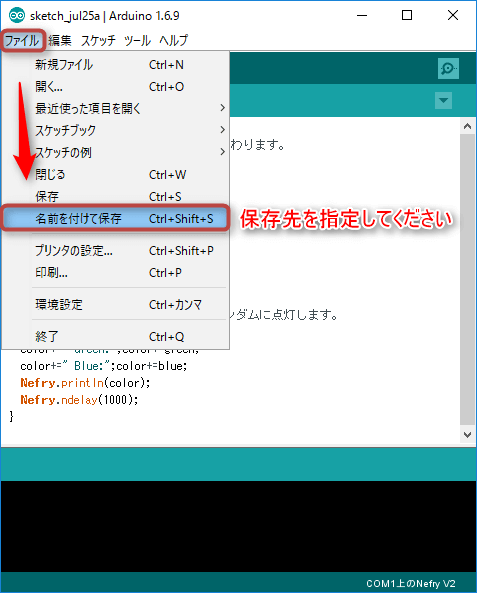
You need to save the program after writing the code. The program will be saved in the location where you chose (Don’t forget the place!).

Click on “Export compiled Binary” to convert the file for Nefry. It takes a little time.

It will display “Done compiling” if there is no problem with the program. If there is, Arduino Software (IDE) shows you where you have to fix (such as “no semicolons”).
In the following part, we will write a program to Nefry.
Writing program on Nefry
Finally let’s write the program on Nefry. Please connect Nefry to the USB port of mobile battery or PC.
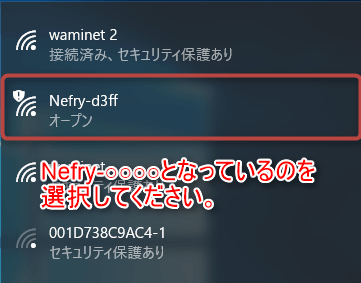
After a while, there will be “Nefry-○○○○” on your Wi-Fi. Please connect to it.

When you have done connecting, main page of Nefry automatically opens. If not, please enter the URL below.
You can do various settings on this page.
To write program on Nefry, you need to change Nefry to writing mode. To change to writing mode, click on “setup Module”.
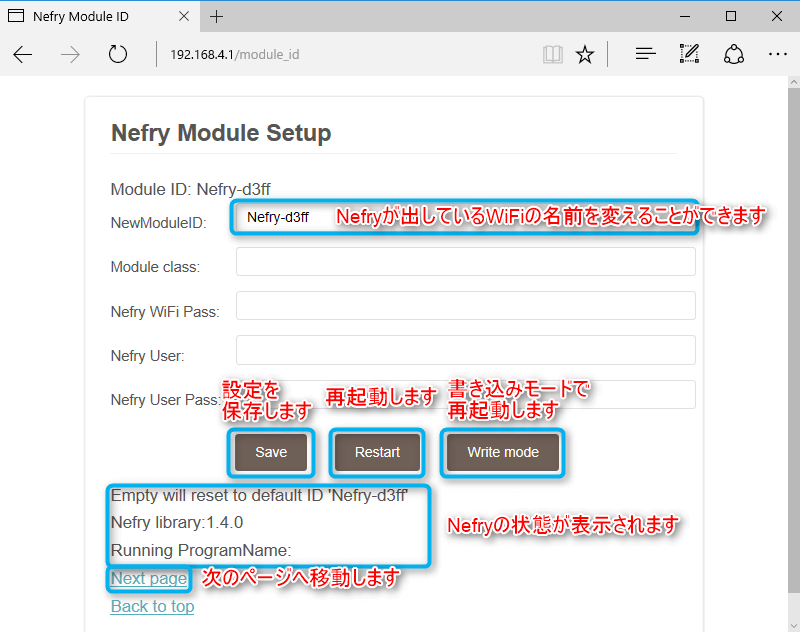
Nefry will automatically restart itself.
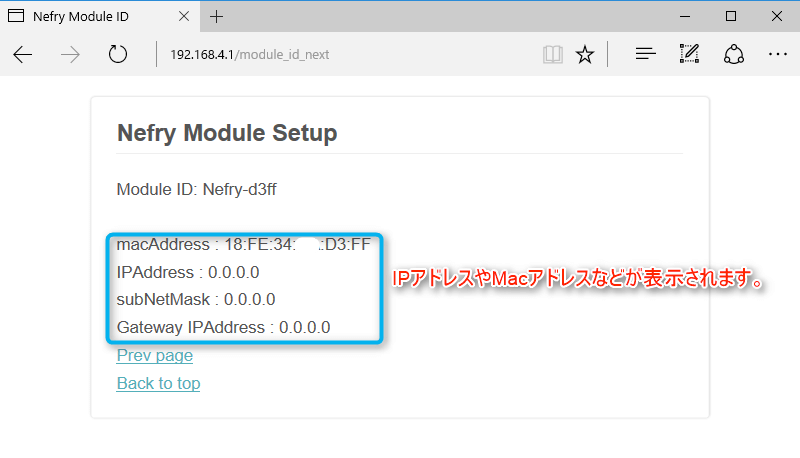
I might as well tell you what happens when you click on “Next page” at setup Module. At there, you can check networking information such as Mac address and IP address.
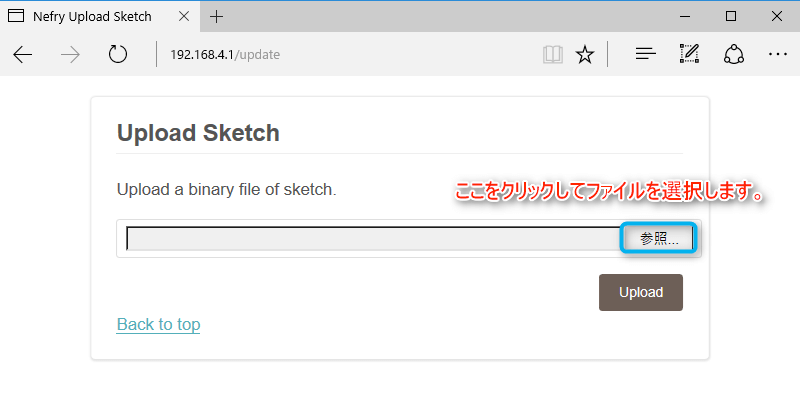
So let’s write the program on Nefry. Click on “Upload Sketch” to open the page. There will be “参照” button where you can choose your file. (You may be displayed different design than this due to your browser.)
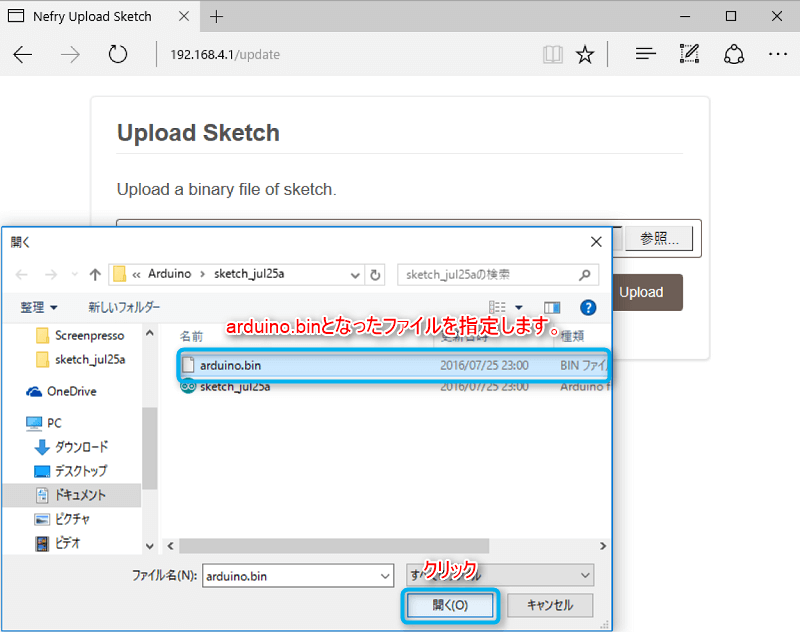
Open “arduino.bin”. (Please make sure you have selected the correct file. (If wrong, Nefry will stop starting up at the worst time so please be aware)
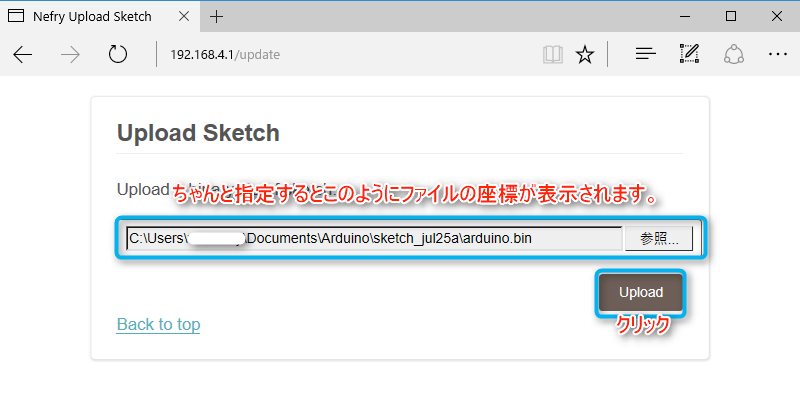
Click on “Upload”. When uploading is completed, Nefry automatically restarts to update the program.
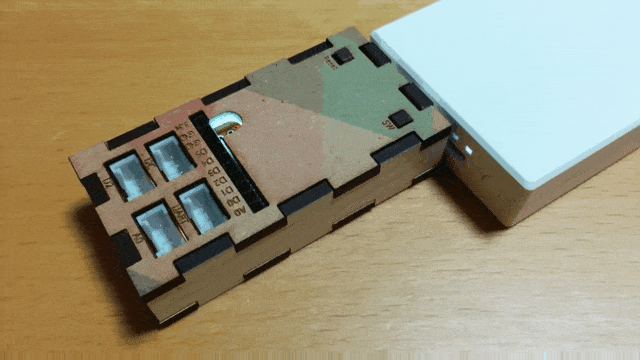
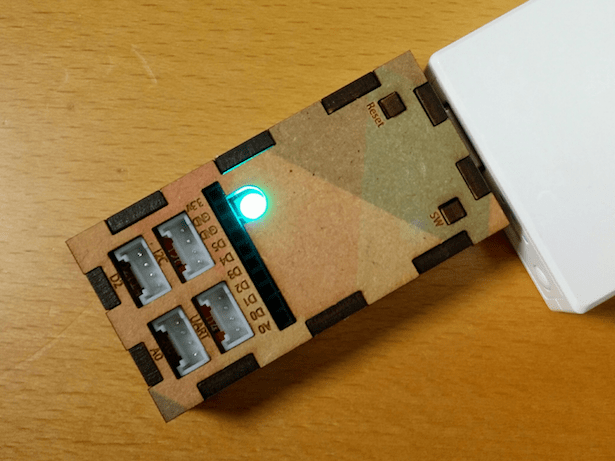
Now, LED shoule be blinking like this.
Besides, there is also a page called “Nefry Console” where you can check the status of Nefry.

Also, at “Web Sketch Download”, you can download program to update your Nefry.
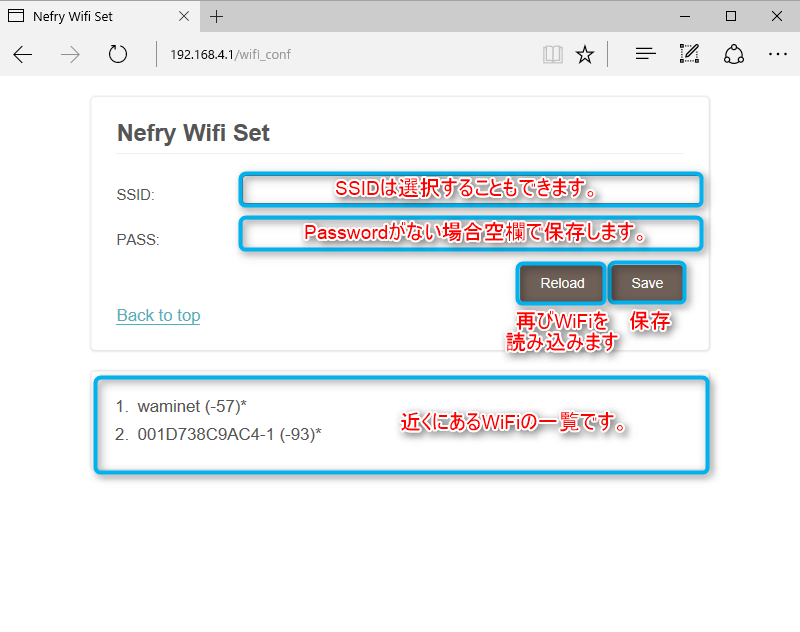
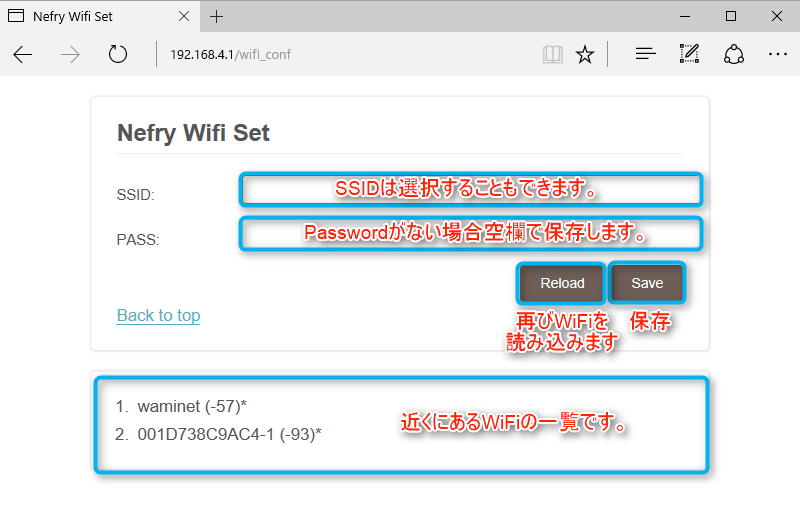
At “Setup WiFi”, you can connect Nefry to your own Wi-Fi.
Conclusion
That’s all for setting up you Nefry. I know it wouold be hard to make developing environment for the first time, but once you have created, that’s all.
Thanks for reading and hope Nefry helps you to try IoT easier.
Original Article (Japanese) : https://liginc.co.jp/298161